A smudged code is almost never an ink problem on its own. It is ink plus distance plus timing plus the surface it lands on, and an egg coder that looks badly adjusted is usually one setting away from clean. The four settings below are the ones worth owning.
An eggshell is a curved, slightly porous surface that arrives at the head at whatever speed the conveyor decides. The printer has to place a character on that curve without contact, in a window measured in milliseconds, and leave it dry enough to survive a tray stack.
That is why the settings interact. Shorten the distance and the code sharpens, until the head clips a tall egg. Speed up the trigger and the placement improves, until a gap in the tray fires a code into empty space.
Shell eggs also vary between species. A thin-shelled duck egg takes ink differently from a hen egg, and a machine tuned on one needs a pass of its own before it runs the other at speed.
None of the four is expensive to change. They are expensive to leave alone. A smudged code is usually discovered at the retailer rather than at the line, and by then the trays have shipped.
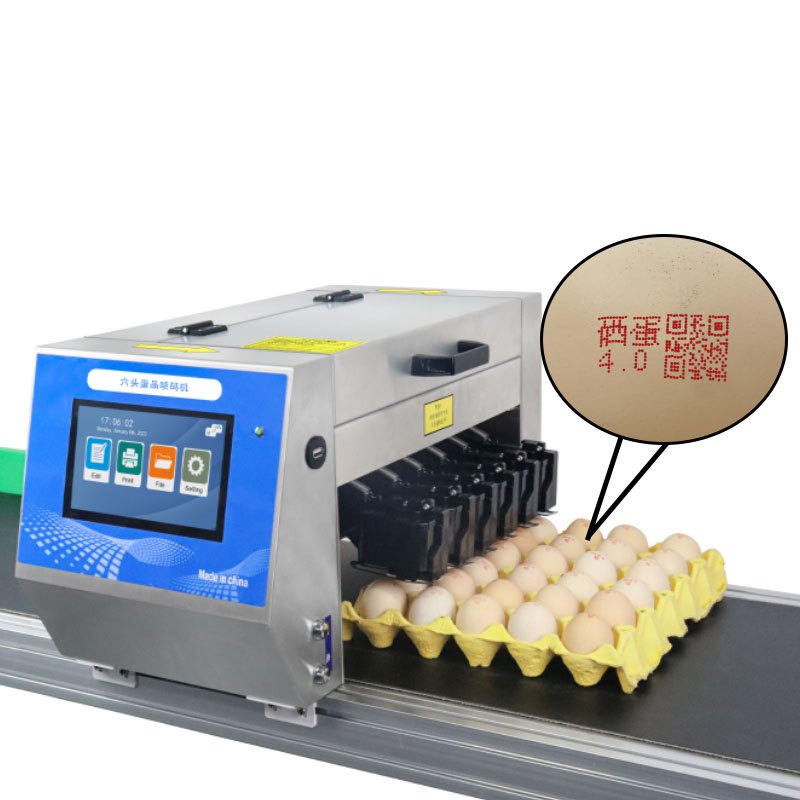
Set the machine the same way every time and the code stops being a daily argument. Start with the tray, not the printer: confirm that the head array covers a full 5×6 tray in one pass with the eggs seated.
Then set the gap, run three trays at production speed, and read the codes at arm’s length under the lighting your buyer uses. If a character closes up, raise resolution before raising ink flow.
The Six Head Egg Inkjet Printer is built around that routine: six heads across the tray, 20 trays per minute at about 600 eggs per minute, and a non-contact 2 to 5 mm print distance so nothing touches the shell. Recording the settings on a card inside the cabinet saves the next shift twenty minutes of guessing. Two operators on one machine will get different results if only one of them was trained, and a laminated card removes the most common cause of a mid-week change in quality.
The settings cost nothing. The hardware behind them does. A machine with independent heads can hold registration across a full tray, and that is the part of the price that shows up in print quality rather than in the specification sheet.
Consumables are the other half. A cartridge price quoted per unit means little until you know how many eggs one covers at your character size. Ask for that figure and compare machines on cost per thousand eggs rather than on cartridge price.
Where the mark has to satisfy a quality audit, consistency is the criterion. ISO 9001 is the framework most buyers point to when they ask how a supplier keeps a process repeatable, and print settings are part of that process.
If your egg coder is laying down smeared or drifting characters, send a photo of the tray and the settings stored in the controller. One of the four above is usually the cause, and an engineer can narrow it from a single image.
More setup questions are answered in the FAQ archive. To compare head counts, start with the machine range, or ask for a fit check against your conveyor.
S10-6
Six print heads, one full 5×6 tray per pass
SHICAI builds food-grade egg coding machines for poultry farms and packers in the US, UK, EU, Australia and worldwide. Tell us your daily volume and egg types, and our engineers will recommend the right model and send a free sample print.
Tell us about your line — we reply within 24h.